- Home
- How to Oil Paint
Your Comprehensive Guide on How to Oil Paint
Do you want to learn how to oil paint? You're at the perfect place for information.
Oil paint offers a unique richness and depth that can transform your artwork. Oil paint is an easy and pleasant medium to use for our modern masterpieces.
This guide includes what is the best paint, brushes, colors, the rules of oil painting and how to use them with a step-by-step oil painting tutorial.
 Oil painting is easy!
 Oil painting is easy!
How to Oil Paint
Start your first oil painting.
What Oil Painting Supplies Do We Need?
This section includes; The recommended oil paint, what to paint on, what brushes we use for oil painting and the colors we need to begin?
What Is the Best Oil Paint?
When we are learning how to oil paint don't skimp on quality.
 Use quality paint for your artwork.
It's best to choose artist paint.
High quality artist paints produce good quality paintings.
You may be wondering why should we use artist quality paint when student paint costs less?
Student paints are less expensive because they contain less color pigment.
Fewer color pigments mean the colors are not as vibrant and the paint
doesn't cover as well. We may have to use several coats of student paint to get bright, juicy colors.
Artist
quality paints contain more color pigments. So, they take less paint per painting. That makes them a better buy after the initial investment.
Alkyd Paint Dries Fast
Alkyds are our modern version of 'oil paint'. They are made with exactly the same color pigments as oil paint.
 Alkyd painting on canvas
Their color pigments are carried by alkyd resin instead of oil.
The resin speeds up their drying time. They are workable for several hours, but dry within 24 hours.
All the colors dry at the same time with the same finish.
They look and handle exactly like oil paint. Their faster drying time makes it easier to learn how to oil paint.
Griffin alkyd paint is an artist quality alkyd made by Winsor and Newton. They been my favorite 'oil paint' since the 1980s.
They are easy to use and they come out of the tube ready to use without adding any medium.
What Do We Paint Oils On?
When we are learning how to oil paint, we have a choice of three painting supports.
 Gessobord is great for details.
Canvas is the traditional oil painting support. The canvas is stretched over and around wood bars.
- Ready-made stretched canvas from the art stores is primed with gesso. The gesso keeps the paint from sinking into the canvas.
- They are ready to paint on; we don't have to anything extra.
Cotton canvas is best for everyday oil painting. Smooth textured linen is great for portraits, but it's more expensive.
Panels may be made from wood or Masonite. They need to be primed with gesso in preparation for painting.
Gessobord an archival panel is primed and ready for painting. It has a smooth surface that is excellent for portraits or other detailed paintings.
Canvas boards are a third option. They are suitable for student work and practice.
What Brushes Do We Use for Oil Painting?
Hog hair brushes are great when we are learning to use oils. Stiff brushes move the paint around better and are easier to use with oil paint.
Synthetic oil brushes are good, too. They seem to wear better than hog hair, so I am switching over to synthetic brushes. That is - except for seascapes. Hog hair brushes are my favorites for painting the ocean.
Start with a couple of brushes like #8 and #12.
Choose from flat, filbert or bright brushes. They are all ideal for oil painting.
- Flats have long bristles that carry plenty of paint.
- Filberts are long like flats, but their corners are rounded off. They work well for paintings where we don't want the brush marks showing.
- Brights have shorter bristles that leave brush strokes for bolder creations.
I don't recommend small or round brushes for learning. They make us too fussy.
Use a palette knife to mix colors. It saves paint compared to mixing with a brush.
When you are learning to oil paint, get the feel of using the paint before investing in more than 2 brushes.
What Colors Do We Need to Start?
Begin painting with the three primary colors, plus white.
- Cadmium Yellow Light
- Cadmium Red
- Ultramarine Blue
- Titanium White is the best white for all around painting.
We use more white than any of the colors, so get a large tube of white.
Winton oil colors made by Winsor and Newton are considered the best student paints because they contain more color pigments than many other brands.
If you're eager to begin painting with oil, understanding the essential rules and techniques can make all the difference.
Oil Painting Rules - Fat Over Lean
There are two basic guidelines for oil painting.
1. Oils are painted THICK over THIN. Some people say, "Paint fat over lean." It's the same thing.
- Start oil paintings thin (lean) by mixing the paint with a solvent. The thinned paint dries quicker than thick paint.
- As the painting progresses, do less thinning. The thicker paint dries slower.
- The final thick (fat) layer of paint will be straight out of the tube with nothing added.
Note: If we paint thin over thick paint, the thick paint underneath is still slowly drying. While it is drying, it may cause the top thin layer to crack.
2. Paint oils from DARK to LIGHT.
- Thinly paint the dark colors first.
- The final colors are the lightest and thickest colors.
It's difficult to paint dark colors over white, light colors. White on the
other-hand, is opaque and it easily covers darker colors.
How to Oil Paint Step-by-Step
This tutorial is an excellent way to get the feel of oil painting.
It will guide you through the crucial steps of oil painting, so you get the most out of this classic medium.
Get Your Supplies for This Tutorial
- Choose a blue color of your choice, Burnt Sienna and a warm yellow like Indian Yellow, Cadmium Yellow Medium or Cadmium Yellow Light.
- The painting is on an 11x14" canvas. You could use a canvas paper pad or a canvas board.
- Flat and bright brushes are both ideal for oil painting. In this painting I used #3, #4 and #5 flats.
- Odorless mineral spirits is the solvent used for thinning the paint and cleaning brushes. Gamsol is recommended for painting indoors.
How Do We Start an Oil Painting?
- It's good to have a reference to paint. Use actual things or a photo.
- Many times, artists will do thumbnail sketches to figure out the composition, forms and values. But for our tutorial, we will be painting from a photo that has all that done for us.
- We start by putting a line drawing on the painting surface. Use paint that has been thinned with a solvent.
Alternately, do a light pencil drawing directly on the canvas.
Or do a drawing on paper and transfer it to the canvas with graphite paper. That's what I did.
More tips on how to start a painting.
 Use a painting reference.
 Put a line drawing on the canvas.
Let's Review the Rules of Oil Painting
Paint THIN to THICK and DARK to LIGHT.
We will:
- Paint THIN, DARK colors first. (The paint is thinned with a solvent.)
- Paint the medium values with medium thickness, use a medium as needed.
- Paint THICK, LIGHT colors last. (The paint is straight out of the tube with nothing added.)
Use these oil painting rules for alkyd and acrylic paintings, also.
1. Paint Thin, Dark Colors
Mix a brown by combining blue and Burnt Sienna.
Make the mixture black for the eyes, nose and feet by adding additional blue.
Thin the paint with solvent.
 Paint the thin, dark colors.
Paint the darks on the body with the thinned brown paint.
Paint the eyes and foot pads black. Add more thinner for the grey nose.
The book is a dark brown and the pages are lightened with extra thinner.
How Do We Fix Mistakes?
It's easy to correct mistakes in the thin stage.
Clean the brush with solvent. Blot the excess solvent on a paper towel.
Brush away the mistake with the clean damp brush. Repeat if needed.
 Thin paint is easy to remove.
When it's thick paint, scrape the thick paint off with a palette knife.
Clean the brush with solvent. Blot the excess solvent on a paper towel.
Brush away the remaining paint. Rinse and repeat, as needed.
Paint the Background
The background is painted in one shot, so we won't use solvent. If your paint is too stiff, thin it with some medium.
- Mix your blue into a pile of white paint.
- Don't thoroughly mix the color on the palette, unless you desire one even color.
- Doing some mixing on the canvas, it gives the painting an artistic appeal.
 Paint with artistic brush marks.
Notice the value difference between the left and right side.
Start painting with the darkest color in the upper right corner.
Lighten the blue with more white as you paint toward the left.
Also, lighten the blue as it goes down to where the bear is sitting.
Get more tips on how to mix colors.
The solvent will make the dark colors dry quickly, so we can start painting the medium colors.
2. Paint the Medium Colors
Mix Burnt Sienna with white and a touch of blue to get a variety of light browns.
Start painting the bear with the medium value colors.
The red arrows point to places painted very lightly or left unpainted for the next step. These will be highlight areas.
 Leave the lightest areas unpainted.
Paint over the darks with a very light stroke. Gently apply a thin layer of paint that allows the dark color to show through.
The darks should be fairly dry so they won't mix with the lighter paint. If they do mix - look under the left ear, the colors mixed. So, what do we do?
Paint away from the dark color, then stop and wipe your brush on a paper towel. Reload with clean medium color to continue painting.
Only wipe the dirty color off the brush with a dry paper towel. Don't clean it with solvent because solvent on the brush will pull the paint off the next few strokes.
3. Paint the Thick, Light Colors
The lightest colors are paint only, no medium added.
- Mix Burnt Sienna and white for the left side of the painting.
- Mix a warm yellow and white for the lightest colors on the right side.
- Load the brush with plenty of paint.
 Tap the light colors on creating fur.
Tap the canvas lightly on the edge, corner and/or the tip of the brush. (Do not use a painting stroke.) Change the position of the brush each time it touches the canvas.
The light colors will mix with the medium colors. When you run out of paint, reload the brush again with plenty of paint.
Continue touching the canvas and lifting the brush up after each touch to create the fur texture.
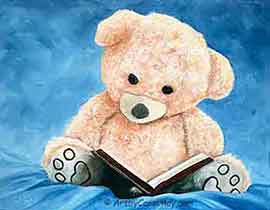
Paint the Bear's Feet and Book
We know how to oil paint now. So, let's do all 3 steps (in the photo below).
- Paint thin, dark color
- Do the medium colors
- Highlight with thick, light colors
 Paint fat over lean and thick over thin.
The bear's feet:
- First, paint the shadows under the book with thin, dark paint.
- Next, mix and paint a medium shadowed color (blue, Burnt Sienna and white).
- Last, mix and paint warm highlight colors on the light part of the feet.
The book:
- The left pages were painted with warm, yellow white.
- The right page was painted with a light medium color used on the feet. Then warm white was painted above the medium color.
- To create more interest, brown was intermittently painted on the left side of the book cover.
#4 The nose:
- Mix a little of the foot's shadow color with white to get a warm, pale grey. Use it to shadow the left side of the bear's muzzle.
- The right side of the nose is a warm yellow white.
Start Painting the Bear's Seat
Mix a thin, dark blue for the dark parts of the bear's seat.
Paint the dark shadows.
 Paint the shadows on the bear's seat.
Finish the Painting
Now you know the basics of how to oil paint.
 Your oil painting is finished.
Only one more thing to paint.
- Paint the medium colors on the bear's seat. As you paint, gently paint into the shadows to make a smooth transition.
- Paint the highlights last and gently blend them into the medium colors to make it resemble fabric.
Touch up anything that catches your eye and your painting is finished.
Frequent Questions About Oil Painting
You may have a few more questions about how to oil paint.
 There are lots of fun things to paint!
How Do We Clean Oil Brushes?
How Do We Clean Oil Brushes?
Oil paints contain oil and we will need a solvent to dissolve the oil and clean our brushes.
Modern day artists use odorless mineral spirits or odorless turpentine.
The odorless mineral spirits, Gamsol made by Gamblin is considered one the best solvents for studio painting. Keep it in a covered container between painting sessions.
If we clean our brushes well with mineral spirits, they may not need additional cleaning. We may periodically clean the brushes with Masters Brush Cleaner which also conditions the brushes.
When I am painting regularly, I use Masters Brush Cleaner about once a month.
Paper towels are handy to wipe the brush between colors and for clean-up later.
How Long Does It Take Oil Paintings to Dry?
How Long Does It Take Oil Paintings to Dry?
Oil paintings may take a few days, up to a week or two (depending on the weather) to dry for safe handling.
The various colors dry at different rates. For example, Burnt Umber, Raw and Burnt Sienna dry faster. The cadmium and quinacridone colors dry slower.
Depending on the color and how thick the paint is, it may take days, up to several months for an oil painting to dry completely.
Griffin Alkyd paint made by Winsor Newton dries overnight or within 24 hours. It comes out of the tube in a paintable consistency, so there is no need to use medium.
That's why all my "oil paintings" are fast drying alkyd paint.
Why Do I Have Dry Sunken in Patches in My Paintings?
Why Do I Have Dry Sunken in Patches in My Paintings?
Some oil colors dry with sheen and other dry flat without any shine.
The fast-drying earth colors like the umbers and siennas tend to dry flat without any sheen. This makes them appear to be sunken in.
I enjoy using the earth colors because they are earth friendly and reasonably priced.
Griffin Alkyd paint made by Winsor Newton solved this dilemma for me. All the colors dry with a lovely soft sheen. That means no flat sunk colors.
What Is a Painting Medium?
What Is a Painting Medium?
Some oil paints come out of the tube ready to use. So, you don't need a painting medium.
Other oil paints come out of the tube thick, stiff and difficult to brush. Mixing the paint with a medium makes it easier to use.
Oil paint is manufactured with linseed oil. So, we can mix in a little extra linseed oil to make the paint easier to use. The extra oil will cause the paint to dry slower.
We can make our own painting medium. Mix half linseed oil with half solvent (turpentine or mineral spirits).
Store the medium in a glass container with a screw tight lid.
What Is the Best Light for Oil Painting?
What Is the Best Light for Oil Painting?
Good lighting is a necessity for painting.
A north window is considered the ultimate light for artists. You don't have a north window to paint by?
Use daylight bulbs which contain full-spectrum lighting.
Regular incandescent bulbs provide a warm light. Paintings done under regular bulbs will appear cool and dull in daylight.
Fluorescent lights have a blue light that skews our color perception. However, daylight fluorescent bulbs are available at many building supply stores.
We also need good ventilation in our painting area. An exhaust fan or a window cracked open are a good option.
A drop cloth will protect the carpet or floor. Get more tips for your home art studio.
Tutorials for More Oil Painting
Do you want to do another oil painting?
 A dog oil painting tutorial
This fun dog tutorial is great for more practice with oil paint.
Use the 2 rules you just learned in this fun dog tutorial.
- Paint dark to light.
- Paint thin to thick.
The painting uses a simple color scheme with only three colors and white.
Black, grey and brown are not included in the three colors.
You get to use the easy method of mixing black, brown and grey from the selected palette colors.
How to Oil Paint Flowers
 This is an easy flower painting.
You can paint these white daisies.
It's easy to paint these daisies in five steps.
1. Assemble your materials and sketch the daisies on the canvas.
2. Paint the dark background before the white flowers.
3. Paint the petals with the background colors in the shadowed areas and highlight the sun-kissed areas with a warm white.
4. Paint the center buttons from dark to light to show their contour.
5. Paint the leaves and stems as you desire.
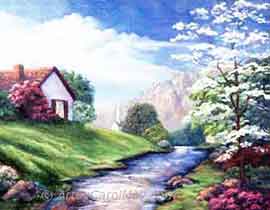
Begin Painting More Oils
 Paint with the rules of oil painting.
This exciting tutorial is for intermediate artists.
It uses the rules of oil painting: Paint dark to light and paint thin to thick.
First you underpaint by blocking in the dark colors of the horse.
Then block in the background water and paint the sky.
While painting thicker and lighter, complete the beach and the ocean waves.
After the sky is dry, highlight and detail the horse.
Have Fun Oil Painting!
You now have a firm foundation on how to oil paint. We've gone from paints and brushes to the technical aspect of painting oils, cleaning brushes and lighting sources.
You are equipped with all the necessary knowledge to start your first oil painting.
More Oil Painting
Paint a Waterfall with Beauty and Drama
Paint a waterfall to add beauty, drama and mystery to our landscape paintings. Add a waterfall to any of your oil paintings, only 3 steps with full instructions
How to Paint Ocean with a Step-by-Step Tutorial
Learn how to paint ocean with a step-by-step tutorial. Just follow the simple steps to create your own seascape paintings. Then enjoy the ocean at home anytime.
How to Paint a Dog: An Easy, Fun Painting on Canvas
How to paint a dog on canvas. A fun, easy dog painting in oils with professional techniques for oil painting in a step-by-step tutorial that uses only 3 colors.
Oil Painting Supplies at Art by Carol May
All about oil painting supplies, what do we need to do an oil painting, best paints, brushes, colors, what to paint on, what are alkyd paints, clean up and more


Recent Articles
-
Paint a Beach Tutorial
Jan 16, 26 06:58 PM
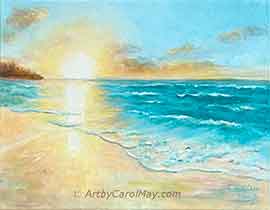 Create stunning beach art with this step-by-step tutorial. A comprehensive guide on how to paint a beach. It only takes five colors to paint this seascape. Learn the steps of painting the easy backgro…
 -
Learn How to Paint
Jan 02, 26 02:00 PM
 Are you new and want to learn how to paint art? On this page, you’ll find ideas of what to paint, the supplies we really need, the fundamentals of good art (values, color, composition), and beginner-f…
 -
How to Oil Paint
Dec 19, 25 02:00 PM
 Are you eager to learn how to oil paint? What are the essential supplies for oil painting? What do we need for clean-up and how long do oil paintings take to dry? Learn the rules of oil painting and t…
Recent Articles
-
Paint a Beach Tutorial
Jan 16, 26 06:58 PM
Create stunning beach art with this step-by-step tutorial. A comprehensive guide on how to paint a beach. It only takes five colors to paint this seascape. Learn the steps of painting the easy backgro… -
Learn How to Paint
Jan 02, 26 02:00 PM
Are you new and want to learn how to paint art? On this page, you’ll find ideas of what to paint, the supplies we really need, the fundamentals of good art (values, color, composition), and beginner-f… -
How to Oil Paint
Dec 19, 25 02:00 PM
Are you eager to learn how to oil paint? What are the essential supplies for oil painting? What do we need for clean-up and how long do oil paintings take to dry? Learn the rules of oil painting and t…